
Use script to create daily, weekly, and monthly rotating backups of virtual machines on CloudFerro Cloud
Rotating backups in OpenStack are a backup strategy where older backups are automatically removed after a defined number of backups is reached. This prevents backup storage from growing indefinitely while keeping a selected number of recent backups available for recovery.
Backup create vs. image create
There are two common ways to create backups under OpenStack:
openstack server backup create
openstack server image create
They behave differently.
Feature |
openstack server backup create |
openstack server image create |
|---|---|---|
Association with VM |
Associated using the backup image property. |
Associated using the backup name. |
Rotation support |
Rotation with –backup-type and incremental backups. |
No built-in rotation support. |
Classification in Horizon |
Marked as image. |
Marked as snapshot. |
Horizon Select Boot Source |
Choose Instance Snapshot. |
Choose Image. |
Purpose |
Primarily used for backups that can be rotated and managed. |
Creates a single VM snapshot without rotation. |
Multiple rotating schedules |
No, only one. |
Yes, for example daily, weekly, and monthly. |
Incremental backup support |
Yes. |
No, always creates a full snapshot. |
Best usage scenario |
Automated backup strategies with built-in rotation. |
Capturing the current state of a VM for cloning or rollback. |
Can be scripted? |
Yes. |
Yes. |
In this article, you will create multiple series of rotating backups with a script that uses several OpenStackClient commands.
Prerequisites
No. 1 Account
You need a CloudFerro Cloud hosting account with access to the Horizon interface: https://portal.cloudferro.com/.
No. 2 VM which will be backed up
You need a virtual machine to back up. If you do not have one yet, you can create it by following one of these articles:
How to create new Linux VM in OpenStack Dashboard Horizon on CloudFerro Cloud
How to create a Linux VM and access it from Windows desktop on CloudFerro Cloud
How to create a Linux VM and access it from Linux command line on CloudFerro Cloud
To learn how to create a Windows virtual machine, see this article:
How to create Windows VM on OpenStack Horizon and access it via web console on CloudFerro Cloud
In this article, the virtual machine that will be backed up is called vm-to-backup. Replace this name with the name of your own virtual machine where needed.
This article covers backing up virtual machines which:
do not have any volumes attached to them,
use ephemeral storage, not persistent storage.
For more information, see Ephemeral vs Persistent storage option Create New Volume on CloudFerro Cloud.
No. 3 Server or computer on which the backup process will run
You need an environment from which the backup commands will be executed.
In this article, that environment runs Ubuntu 24.04 LTS and is called backing-server. It can be, among others:
a virtual machine on CloudFerro Cloud cloud,
your own physical server,
a virtual machine running outside CloudFerro Cloud cloud.
Make sure that this environment can connect to CloudFerro Cloud cloud.
The environment must be running whenever a new backup should be created.
No. 4 OpenStackClient installed on backing-server
You need OpenStackClient installed on backing-server.
How to install OpenStackClient for Linux on CloudFerro Cloud
No. 5 Application credentials
In this article, the backup operation is automated, so authentication should be automated as well.
For this purpose, use application credentials stored in a clouds.yml file.
Follow How to generate or use Application Credentials via CLI on CloudFerro Cloud to create a clouds.yml file with your application credentials.
Copy clouds.yml to backing-server. Once installed, the openstack command searches for clouds.yml in these locations by default:
$HOME/.config/openstack/clouds.yml
/etc/openstack/clouds.yml
You can place clouds.yml in either of them. Then you will be able to use the credentials from any directory.
$HOME is the environment variable that usually points to your home directory.
You can also place clouds.yml in another directory, but then you need to run the openstack command from that directory or point OpenStackClient to that file explicitly.
Important
The clouds.yml file stores credentials in plain text. Make sure that the location where you store it is sufficiently protected.
The clouds.yml file may store multiple credential profiles. To choose the profile used by OpenStackClient, use the –os-cloud parameter. In this article, the placeholder profile name is backup_test.
On CloudFerro Cloud, application credentials can work across multiple regions. The region is selected with the –os-region parameter.
For the examples in this article, define the following shell variables:
OS_CLOUD_NAME="backup_test"
Use the tab for the region in which your virtual machine exists:
OS_REGION_NAME="WAW4-1"
OS_REGION_NAME="WAW3-1"
OS_REGION_NAME="WAW3-2"
OS_REGION_NAME="FRA1-2"
OS_REGION_NAME="FRA1-3"
OS_REGION_NAME="LCJ1-1"
Important
These shell variables are valid only in the current terminal session. If you open a new terminal, define them again.
To test the credentials and region, list virtual machines in your project:
openstack server list \
  --os-cloud "$OS_CLOUD_NAME" \
  --os-region "$OS_REGION_NAME"
No. 6 Knowledge of cron under Linux
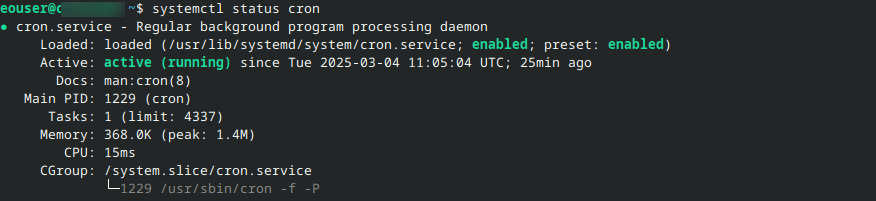
cron is a standard Linux tool for executing tasks according to a predefined schedule. This article uses cron to automate rotating backups.
If cron is installed, the following command:
systemctl status cron
should produce output similar to this:
If cron is not installed, install and enable it:
sudo apt update
sudo apt install cron -y
sudo systemctl enable --now cron
systemctl status cron
No. 7 Plain text editor installed on backing-server
Two common terminal editors are vim and nano.
Install vim:
sudo apt install vim
Or install nano:
sudo apt install nano
To choose the default text editor on Ubuntu 24.04, run:
select-editor
You should be prompted to choose the editor by number, for example:
Select an editor.  To change later, run 'select-editor'.
  1. /bin/nano        <---- easiest
  2. /usr/bin/vim.basic
  3. /usr/bin/vim.tiny
  4. /bin/ed

Choose 1-4 [1]:
Choose the editor you want to use and press Enter.
The rotating backup algorithm
Before the backup script is run for the first time, define:
- Backup series name
For example daily, weekly, or monthly.
- Rotation limit
The number of backups to retain. This article refers to this number as maxN.
Each time the script runs, it performs these operations:
- Renaming backups
Existing backups are renamed so that their numbers show which backup is newest and which one is oldest. Backup number 1 is always the newest.
- Deleting the oldest backup
If the number of backups becomes greater than maxN, the oldest backup is deleted.
- Creating a new backup
A new backup with number 1 in its name is created.
Creating a backup manually without rotating
The command openstack server image create creates full snapshots, but it has no built-in parameter for rotating backups.
The simplest form of the command looks like this:
openstack server image create \
  --name my-vm-backup \
  --os-cloud "$OS_CLOUD_NAME" \
  --os-region "$OS_REGION_NAME" \
  my-vm
In this command:
my-vm-backup is the name of the backup,
my-vm is the name of your virtual machine,
–os-cloud selects the application credentials profile,
–os-region selects the region.
To delete an old image, use:
openstack image delete \
  --os-cloud "$OS_CLOUD_NAME" \
  --os-region "$OS_REGION_NAME" \
  my-vm-backup
Multiple rotating schedules
Manual backup commands are error-prone. You may forget to run them, use a wrong VM name, or use a wrong backup name.
A script can run at predefined times and can support multiple rotating backup series. For example, you can have separate daily, weekly, and monthly backup series for the same virtual machine.
The script in this article uses:
openstack image set to rename existing backups,
openstack server image create to create a new backup,
openstack image delete to delete the oldest backup.
Each backup name consists of:
the instance name, for example vm-to-backup,
a dash,
the backup series name, for example weekly,
a dash,
the backup number from 1 to maxN.
For example:
vm-to-backup-weekly-3
Step 1: Create a script
Open your text editor, create file backup.sh, and enter the following script:
#!/bin/bash

if [[ "$#" -ne 5 ]]
then
  echo "Expecting 5 arguments: vm name, backup name, number of backups, os-cloud name, os-region name"
  exit 1
fi

vm_name=$1
backup_core_name=$1"-"$2
count=$3
os_cloud_name=$4
os_region_name=$5

reifnumber='^[0-9]+$'
if ! [[ $count =~ $reifnumber ]]
then
  echo "Given backup count is not a number"
  exit 1
fi

# Rename all previous backups by adding 1 to their number.
for i in $(seq "$count" -1 1)
do
  openstack image set \
    --name "$backup_core_name-$((i+1))" \
    "$backup_core_name-$i" \
    --os-cloud "$os_cloud_name" \
    --os-region "$os_region_name"
done

# Delete the backup whose number is greater by 1 than the rotation limit.
openstack image delete \
  "$backup_core_name-$((count+1))" \
  --os-cloud "$os_cloud_name" \
  --os-region "$os_region_name"

# Create a new backup with number 1.
openstack server image create \
  --name "$backup_core_name-1" \
  "$vm_name" \
  --os-cloud "$os_cloud_name" \
  --os-region "$os_region_name"
This version accepts the OpenStack cloud profile and region as arguments, so the script does not contain hard-coded region names.
Save backup.sh in your home directory.
Add executable permissions:
chmod +x backup.sh
Step 2: Run the script
From your home directory, test the script.
The script accepts five arguments:
the name or ID of the virtual machine, for example vm-to-backup,
the name of the backup series, for example manual-backup,
the number of backups to keep, for example 3,
the name of the OpenStack cloud profile, for example backup_test,
the name of the region.
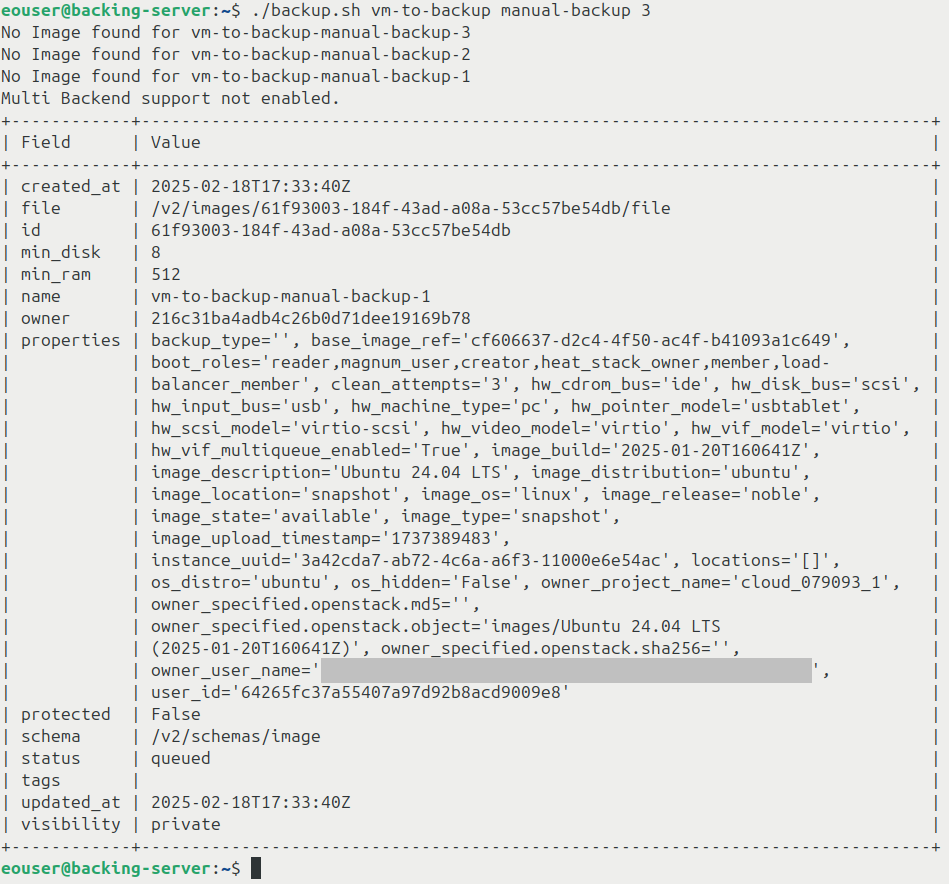
Run:
./backup.sh vm-to-backup manual-backup 3 "$OS_CLOUD_NAME" "$OS_REGION_NAME"
You should get output similar to this:
Show backup files
The backup files created by the script are snapshots. To list all snapshots in the project, run:
openstack image list \
  --property image_type=snapshot \
  --os-cloud "$OS_CLOUD_NAME" \
  --os-region "$OS_REGION_NAME"
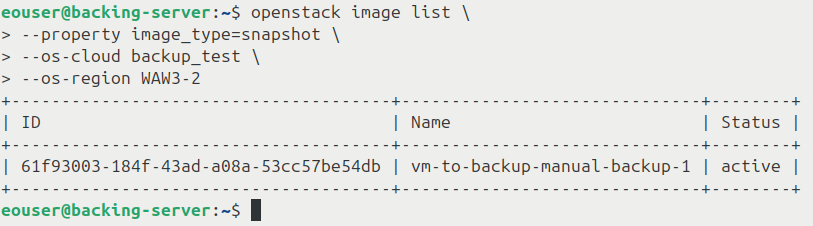
Some snapshots may be backups created by this script, while others may have been created manually or imported.
How the script behaves during repeated runs
The example below shows what happens when you run the script with the same arguments four times in a row.
Before this run, there are no backups in the project.
The script attempts to rename existing backups:
Original number |
Number after rename |
Outcome |
|---|---|---|
3 |
4 |
Fail |
2 |
3 |
Fail |
1 |
2 |
Fail |
These images do not exist yet, so rename operations fail with messages such as No Image found.
The script then attempts to delete vm-to-backup-manual-backup-4. This image does not exist yet, so the deletion fails.
Finally, the script creates a new backup named vm-to-backup-manual-backup-1.
Backups after this run:
vm-to-backup-manual-backup-1
Before this run, there is one backup:
vm-to-backup-manual-backup-1
The script attempts to rename existing backups:
Original number |
Number after rename |
Outcome |
|---|---|---|
3 |
4 |
Fail |
2 |
3 |
Fail |
1 |
2 |
Success |
Only the last rename succeeds because backup number 1 exists.
The script then creates a new backup named vm-to-backup-manual-backup-1.
Backups after this run:
vm-to-backup-manual-backup-1
vm-to-backup-manual-backup-2
Before this run, there are two backups:
vm-to-backup-manual-backup-1
vm-to-backup-manual-backup-2
The script attempts to rename existing backups:
Original number |
Number after rename |
Outcome |
|---|---|---|
3 |
4 |
Fail |
2 |
3 |
Success |
1 |
2 |
Success |
This time, two rename operations succeed.
The script then creates a new backup named vm-to-backup-manual-backup-1.
Backups after this run:
vm-to-backup-manual-backup-1
vm-to-backup-manual-backup-2
vm-to-backup-manual-backup-3
The number of backups is now equal to maxN. During the next run, one image will be removed.
Before this run, there are three backups:
vm-to-backup-manual-backup-1
vm-to-backup-manual-backup-2
vm-to-backup-manual-backup-3
The script attempts to rename existing backups:
Original number |
Number after rename |
Outcome |
|---|---|---|
3 |
4 |
Success |
2 |
3 |
Success |
1 |
2 |
Success |
After renaming, the project contains:
vm-to-backup-manual-backup-2
vm-to-backup-manual-backup-3
vm-to-backup-manual-backup-4
The script deletes vm-to-backup-manual-backup-4, because its number is greater than maxN.
Then it creates a new backup named vm-to-backup-manual-backup-1.
Backups after this run:
vm-to-backup-manual-backup-1
vm-to-backup-manual-backup-2
vm-to-backup-manual-backup-3
Later runs behave like the fourth run, assuming that you always use the same arguments and that no command fails unexpectedly.
Step 3: Open the crontab file
Use cron to automate the rotating backups.
Open the crontab file:
crontab -e
Depending on your system, either:
the file opens in the default text editor,
or you are prompted to choose the default text editor.
To choose the editor only for this command, use the EDITOR variable.
Open crontab in nano:
EDITOR=nano crontab -e
Open crontab in vim:
EDITOR=vim crontab -e
Step 4: Edit the crontab file
Remove previous backup schedules from this file if you no longer need them.
Create cron jobs for the backup schedules you want to use.
The crontab file may look like this:
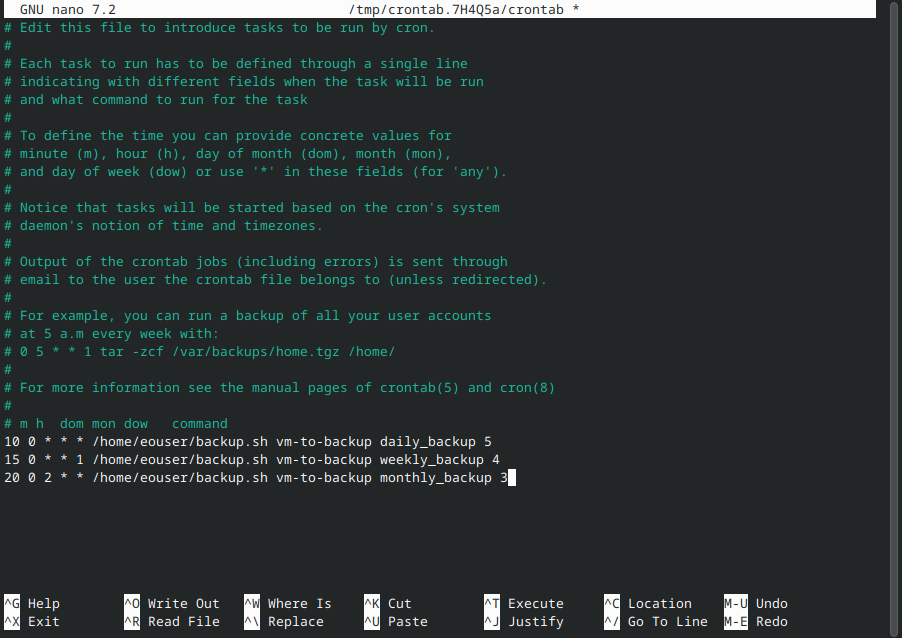
After you finish editing, save the file and exit the editor. If the jobs are defined correctly, they will run according to their schedules.
Examples of cron jobs
Daily
10 0 * * * /home/eouser/backup.sh vm-to-backup daily_backup 5 backup_test FRA1-3
This job runs daily 10 minutes after midnight. It creates the daily_backup series for VM vm-to-backup and keeps five backups.
Replace backup_test and FRA1-3 with your actual cloud profile and region.
After five days, the list of backups should look similar to this:
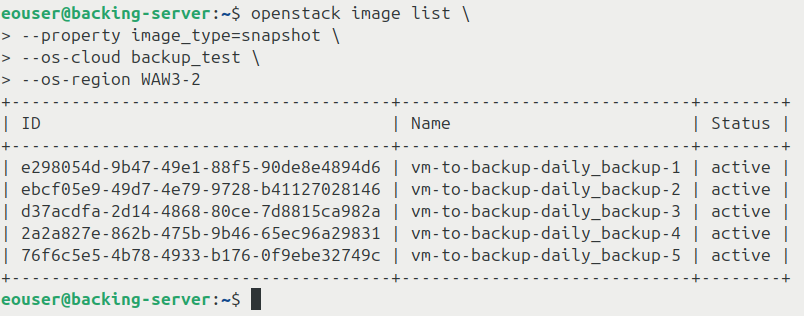
Backup number 1 is the newest and backup number 5 is the oldest.
Weekly
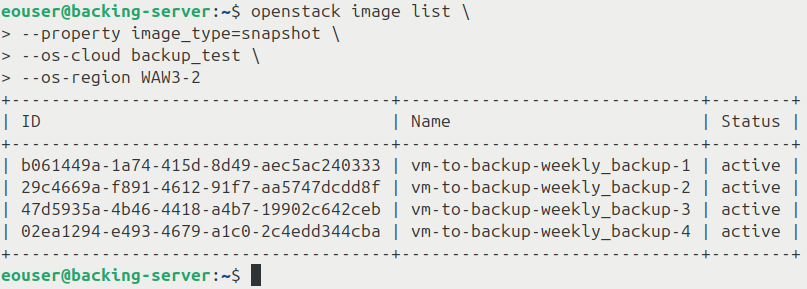
15 0 * * 1 /home/eouser/backup.sh vm-to-backup weekly_backup 4 backup_test FRA1-3
This job runs every Monday 15 minutes after midnight. It creates the weekly_backup series and keeps four backups.
After four weeks, the list of backups should look similar to this:
Monthly
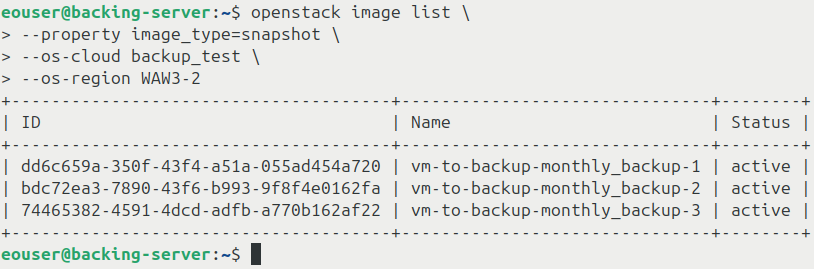
20 0 2 * * /home/eouser/backup.sh vm-to-backup monthly_backup 3 backup_test FRA1-3
This job runs every second day of the month 20 minutes after midnight. It creates the monthly_backup series and keeps three backups.
After three months, the list of backups should look similar to this:
Limitations
This script illustrates one possible way to create multiple rotating backup series.
Once you have one backup series, do not run the script for that series with a smaller rotation limit than the number of backups that already exist.
For example, if you have a VM called my-vm and five weekly backups, do not run:
./backup.sh my-vm weekly 4 "$OS_CLOUD_NAME" "$OS_REGION_NAME"
The script also does not include advanced error handling or reporting. If a backup operation fails, for example because OpenStack API connectivity is unavailable, the backup series may not be rotated as expected.
Do not use the same naming convention for images that you create manually outside this script. Otherwise, the script may rename or delete images that were not intended to be part of the rotating backup series.
How to restore backups
Backups created by this script are snapshots. Like other OpenStack images, they can be used to:
create new virtual machines,
replace the contents of an existing virtual machine disk by rebuilding the virtual machine.
Before restoring a backup, it is recommended to create a copy of that image. This prevents the rotating backup series from being unexpectedly interrupted when the original backup is later renamed or deleted by the script.
Step 1: Find the size and name or ID of the image to restore
List snapshots in your project:
openstack image list \
  --property image_type=snapshot \
  --os-cloud "$OS_CLOUD_NAME" \
  --os-region "$OS_REGION_NAME"
Choose the backup you want to restore. In this example, the chosen backup is my-backup2.
Write down the name or ID of this image.
You also need the minimum disk size required by the image:
openstack image show \
  -c min_disk \
  --os-cloud "$OS_CLOUD_NAME" \
  --os-region "$OS_REGION_NAME" \
  my-backup2
The output should return the value in GB:
+----------+-------+
| Field    | Value |
+----------+-------+
| min_disk | 8     |
+----------+-------+
Step 2: Create a volume from the image
Because OpenStack does not copy an image directly in this workflow, first create a temporary volume from the image:
openstack volume create \
  --image my-backup2 \
  --size 8 \
  --os-cloud "$OS_CLOUD_NAME" \
  --os-region "$OS_REGION_NAME" \
  my-backup2-volume
Where:
my-backup2 is the name or ID of your image,
8 is the minimum volume size for your image in GB,
my-backup2-volume is the name of the temporary volume.
At first, the volume will likely have status uploading. Wait until it becomes available.
Check the status:
openstack volume show \
  -c status \
  --os-cloud "$OS_CLOUD_NAME" \
  --os-region "$OS_REGION_NAME" \
  my-backup2-volume
Step 3: Create an image from the volume
Create an image from the temporary volume:
openstack image create \
  --volume my-backup2-volume \
  --os-cloud "$OS_CLOUD_NAME" \
  --os-region "$OS_REGION_NAME" \
  my-backup2-copy
At first, the image will likely have status uploading. Wait until it becomes active.
Check the status:
openstack image show \
  -c status \
  --os-cloud "$OS_CLOUD_NAME" \
  --os-region "$OS_REGION_NAME" \
  my-backup2-copy
Step 4: Delete the temporary volume
After the image copy has been created, delete the temporary volume:
openstack volume delete \
  --os-cloud "$OS_CLOUD_NAME" \
  --os-region "$OS_REGION_NAME" \
  my-backup2-volume
The output should be empty.
Step 5: Restore the backup
You now have a copy of the backup you want to restore. The original backup can remain part of the rotating backup series.
Choose one of the following restore methods.
Method 1: Rebuild an existing instance
Rebuilding an instance replaces the current contents of the virtual machine disk with the contents of an image. Metadata such as VM name or ID is kept. This also includes floating IP assignments.
During this process, the virtual machine is unavailable.
Warning
This operation removes data from the virtual machine on which it is performed. Make sure that the virtual machine does not contain any data that you need to keep.
Rebuild the VM from the copied image:
openstack server rebuild \
  --image my-backup2-copy \
  --os-cloud "$OS_CLOUD_NAME" \
  --os-region "$OS_REGION_NAME" \
  vm-to-backup
You should get output similar to this:
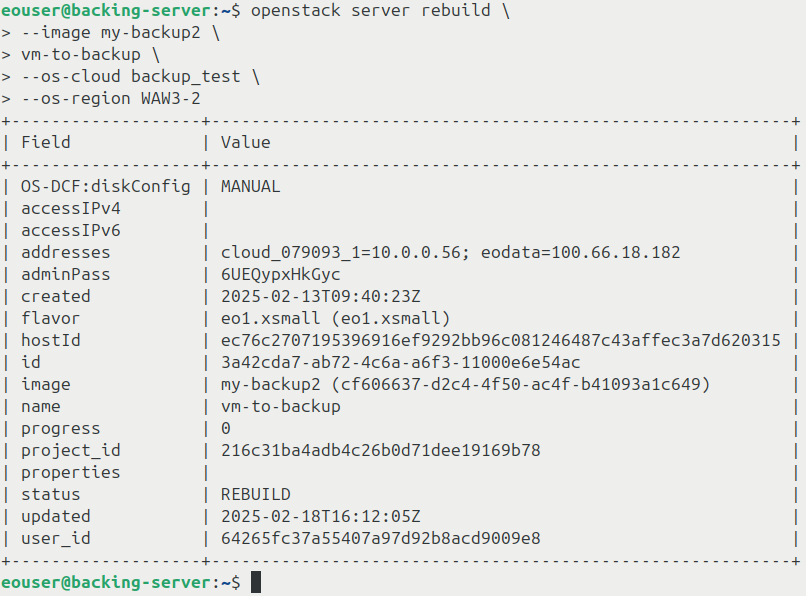
The VM status should become REBUILD.
Wait until restoration is complete. The virtual machine should then be turned on and ready to use.
Check the VM status:
openstack server show \
  --os-cloud "$OS_CLOUD_NAME" \
  --os-region "$OS_REGION_NAME" \
  vm-to-backup
To show only the status, add -c status:
openstack server show \
  -c status \
  --os-cloud "$OS_CLOUD_NAME" \
  --os-region "$OS_REGION_NAME" \
  vm-to-backup
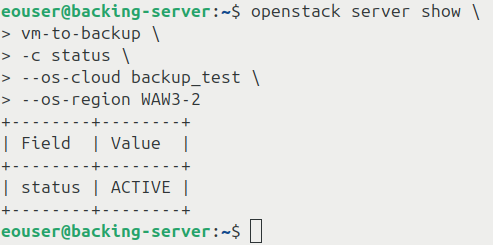
If the status is ACTIVE, the VM should be ready.
Method 2: Create a new virtual machine from backup
Images created by this workflow can also be used to create a new virtual machine. The new VM will contain the files and operating system from the backup. This does not affect the original virtual machine.
If the original VM had floating IP addresses and you want to reuse them, first detach them from the original VM. The floating IPs remain in your project and can then be assigned to the new VM.
Follow instructions from How to create a VM using the OpenStack CLI client on CloudFerro Cloud cloud.
In the Image section of Step 1 of that article:
use the ID of the copied backup image.
In the Flavor section, choose a flavor that is large enough to run the restored system. It will often be the same flavor that was used for the original virtual machine.
Problems and troubleshooting
When using:
openstack image create \
  --volume my-backup2-volume \
  --os-cloud "$OS_CLOUD_NAME" \
  --os-region "$OS_REGION_NAME" \
  my-backup2-copy
you may receive a message similar to this:
VolumeManager.upload_to_image() got an unexpected keyword argument 'visibility' when trying to create an image from Volume
This means that the version of OpenStackClient and the version of OpenStack in the cloud may not be fully compatible.
A practical workaround is to set OS_VOLUME_API_VERSION to 3.1 or a higher supported value:
export OS_VOLUME_API_VERSION=3.1
You can also use the –os-volume-api-version parameter with the openstack image create command:
openstack image create \
  --volume my-backup2-volume \
  --os-volume-api-version 3.1 \
  --os-cloud "$OS_CLOUD_NAME" \
  --os-region "$OS_REGION_NAME" \
  my-backup2-copy
What to do next
The script used in this article creates instance snapshots.
See How to create instance snapshot using Horizon on CloudFerro Cloud for additional information.
If you do not need multiple rotating schedules, the official openstack server backup create command may be a better choice.
Use backup command to create rotating backups of virtual machines on CloudFerro Cloud cloud