How to enable CORS while accessing Object Storage Containers on CloudFerro Cloud
When accessing objects stored in an Object Storage container from another domain, browsers may block the request due to Cross-Origin Resource Sharing (CORS) restrictions.
CORS defines a mechanism that allows web applications to request resources from a different origin. If the target service (for example, the S3 endpoint of CloudFerro Cloud) does not return the required CORS headers, the browser denies the request and displays errors such as:
Header ‘Access-Control-Allow-Origin’ missing
CORS preflight channel did not succeed
Access to XMLHttpRequest has been blocked by CORS policy
This procedure describes how to enable CORS on the S3 endpoint and how to verify the configuration.
Important
On CloudFerro Cloud clouds there are typically two endpoints for object storage access:
Swift-style URL (containing /swift/v1/…)
S3-style URL (bucket directly below the S3 endpoint)
The s3cmd setcors command applies only to the S3 endpoint. CORS requests sent to the Swift URL will not return CORS headers.
What we are going to cover
Prerequisites
No. 1 Account
A CloudFerro Cloud hosting account with access to the Horizon interface: https://horizon.cloudferro.com/auth/login/?next=/.
No. 2 Object storage container
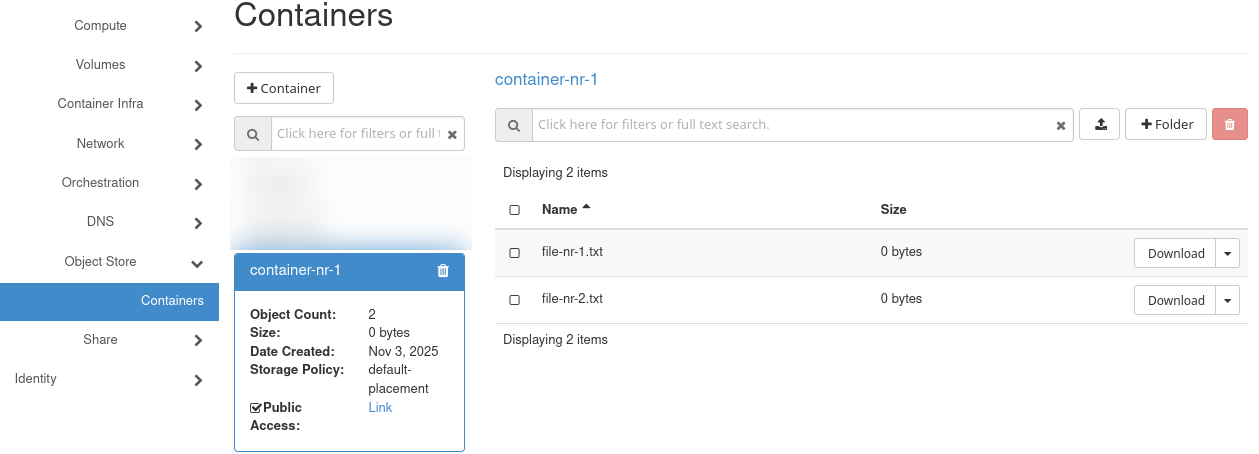
At least one container must exist on CloudFerro Cloud cloud. See How to use Object Storage on CloudFerro Cloud for instructions.
Example container: container-nr-1, containing file-nr-1.txt and file-nr-2.txt.

Enable Public Access in Horizon to obtain a link to the container.
Warning
Example URLs for WAW4-1 region:
Container: https://s3.waw4-1.cloudferro.com/container-nr-1/
Object: https://s3.waw4-1.cloudferro.com/container-nr-1/file-nr-1.txt
Replace these values with the endpoint and container name specific to your environment. Do not use Swift URLs (/swift/v1/…) for CORS tests.
No. 3 OpenStack CLI client
If you want to interact with CloudFerro Cloud cloud using OpenStack CLI client, you need to have it installed. Check one of these articles:
How to install OpenStackClient for Linux on CloudFerro Cloud
How to install OpenStackClient GitBash for Windows on CloudFerro Cloud
Once you have installed this piece of software, you need to authenticate to start using it: How to activate OpenStack CLI access to CloudFerro Cloud cloud using one- or two-factor authentication
To verify whether the openstack command is working, list flavors:
openstack flavor list
No. 4 EC2 (S3) credentials, s3cmd, and configuration file
Generate EC2 credentials as described in How to generate and manage EC2 credentials on CloudFerro Cloud.
EC2 / S3 credentials are project-scoped. They must be created in the same project where the container resides. Otherwise, S3 operations will faile with 403 AccessDenied.
Generate credentials:
openstack ec2 credentials create -f json
From the output, copy access and secret values.
Create and save a configuration file named jdoe-test-s3cfg with WAW4-1 parameters:
# File: jdoe-test-s3cfg
access_key = <access>
secret_key = <secret>
host_base = s3.waw4-1.cloudferro.com
host_bucket = s3.waw4-1.cloudferro.com
bucket_location = dias_default
use_https = True
signature_v2 = True
host_bucket ensures path-style access.
signature_v2 enables compatibility with legacy S3 signatures.
bucket_location reflects the typical region setting.
Verify connectivity to S3:
s3cmd -c jdoe-test-s3cfg ls
If this returns 403 AccessDenied, confirm:
the credentials were created in the same project as the container,
the endpoint (s3.waw4-1.cloudferro.com) is correct, and
the container really exists.
If s3cmd is not installed, see:
How to access object storage from CloudFerro Cloud using s3cmd
No. 5 Python 3 and local HTTP server for testing
The test HTML page must be accessed over HTTP. If it is opened directly from disk (file://), the browser assigns the page a null origin, which prevents correct CORS evaluation.
Python 3 provides a minimal HTTP server. Navigate to the directory containing test-cors.html and run:
python3 -m http.server 8000
Then open in a browser:
http://localhost:8000/test-cors.html
This is sufficient for reproducing and verifying CORS behavior in a local environment.
Procedure overview
This procedure consists of the following steps:
Save the CORS test page locally.
Serve the page via HTTP instead of file://.
Test first with the Swift URL (to observe the CORS restriction).
Apply CORS settings to the bucket using s3cmd setcors.
Repeat the test with the S3 URL (to verify that CORS is enabled).
Note
CORS behavior can only be observed from a web browser. CLI tools like curl or s3cmd are not affected by CORS restrictions.
Step 1 – Create a test page to reproduce the CORS restriction
Before enabling CORS, verify the browser behavior when CORS is not configured.
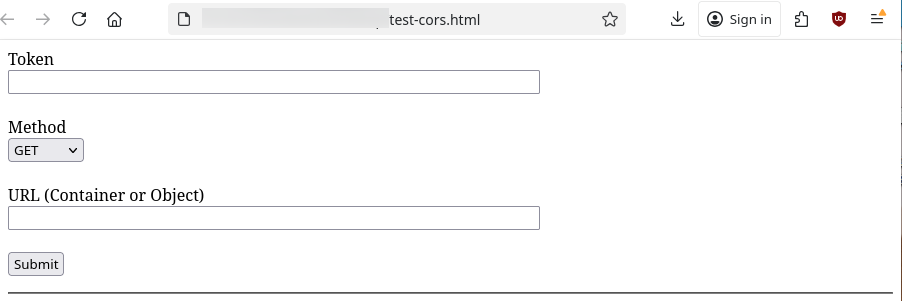
Create a simple HTML test page that intentionally triggers a CORS violation. This will demonstrate the “blocked by CORS policy” response before applying the configuration.
The test page is based on the example in the OpenStack Swift documentation:
https://docs.openstack.org/swift/latest/cors.html#test-cors-page
Save the following content as test-cors.html:
<!DOCTYPE html>
<html>
  <head>
    <meta charset="utf-8">
    <title>Test CORS</title>
  </head>
  <body>
    Token<br><input id="token" type="text" size="64"><br><br>
    Method<br>
    <select id="method">
        <option value="GET">GET</option>
        <option value="HEAD">HEAD</option>
        <option value="POST">POST</option>
        <option value="DELETE">DELETE</option>
        <option value="PUT">PUT</option>
    </select><br><br>
    URL (Container or Object)<br><input id="url" size="64" type="text"><br><br>
    <input id="submit" type="button" value="Submit" onclick="submit(); return false;">
    <pre id="response_headers"></pre>
    <hr>
    <pre id="response_body"></pre>

    <script type="text/javascript">
      function submit() {
          var token = document.getElementById('token').value;
          var method = document.getElementById('method').value;
          var url = document.getElementById('url').value;
          document.getElementById('response_headers').textContent = null;
          document.getElementById('response_body').textContent = null;
          var request = new XMLHttpRequest();
          request.onreadystatechange = function () {
              if (request.readyState == 4) {
                  var responseHeaders = 'Status: ' + request.status;
                  responseHeaders += '\\nStatus Text: ' + request.statusText;
                  responseHeaders += '\\n\\n' + request.getAllResponseHeaders();
                  document.getElementById('response_headers').textContent = responseHeaders;
                  document.getElementById('response_body').textContent = request.responseText;
              }
          }
          request.open(method, url);
          if (token != '') {
              request.setRequestHeader('X-Auth-Token', token);
          }
          request.send(null);
      }
    </script>
  </body>
</html>
This file will be used:
first, to reproduce the error “Access-Control-Allow-Origin missing”, and
later, to confirm that CORS is functioning after configuration.
Step 2 – Serve the file over HTTP
Access the test page through the local HTTP server configured in Prerequisite No. 5.
This ensures the browser origin is valid (for example, http://localhost:8000) rather than null, which would otherwise prevent CORS validation.
Open in the browser:
http://localhost:8000/test-cors.html

Step 3 – Test with Swift URL
The goal of this step is to reproduce a CORS violation and observe the resulting browser error message.
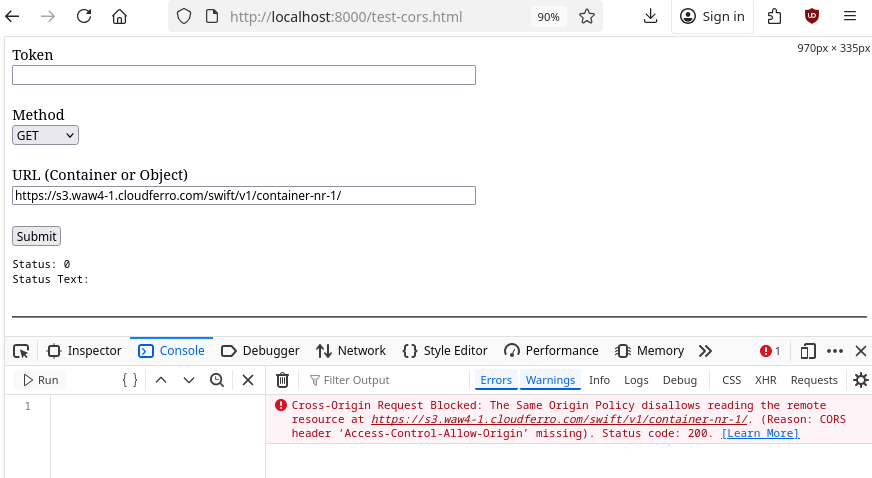
Enter the Swift-style URL in the test page:
https://s3.waw4-1.cloudferro.com/swift/v1/container-nr-1/
After clicking Submit, the Status is 0 and the Status text field is empty. Open the browser’s developer console to inspect the resulting error message.

It displays the following message:
Cross-Origin Request Blocked: The Same Origin Policy disallows reading the remote resource at https://s3.waw4-1.cloudferro.com/swift/v1/container-nr-1/. (Reason: CORS header ‘Access-Control-Allow-Origin’ missing). Status code: 200.
Other similar messages it could display would be:
Access to XMLHttpRequest has been blocked by CORS policy
No ‘Access-Control-Allow-Origin’ header is present on the requested resource
This confirms that CORS is not applied on the Swift endpoint.
Step 4 – Verify current CORS status
Run:
s3cmd -c jdoe-test-s3cfg info s3://container-nr-1
Expected output:

The value of CORS: is none.
Step 5 – Create a CORS configuration
Create cors.xml with the following content:
<CORSConfiguration>
  <CORSRule>
    <AllowedOrigin>*</AllowedOrigin>
    <AllowedMethod>GET</AllowedMethod>
    <AllowedHeader>*</AllowedHeader>
  </CORSRule>
</CORSConfiguration>
This configuration allows GET requests from any origin. For production use, restrict the <AllowedOrigin> value to trusted domains only. The parameters shown in this article are intended for testing purposes, and should not be used in production environments.
Note
XML tags in cors.xml are case-sensitive. Ensure that element names such as <CORSConfiguration> and <AllowedOrigin> are capitalized exactly as shown.
Step 6 – Apply CORS to the bucket
Apply the CORS configuration stored in cors.xml to the container and verify that it was applied successfully:
s3cmd -c jdoe-test-s3cfg setcors cors.xml s3://container-nr-1
s3cmd -c jdoe-test-s3cfg info s3://container-nr-1
The command output now shows the configured CORS policy:

The CORS field contains the contents of cors.xml. Currently, only the GET method is allowed. You can extend the configuration to include other HTTP methods such as POST, PUT, or DELETE.
Example output:
CORS: <CORSConfiguration ...><CORSRule><AllowedMethod>GET</AllowedMethod><AllowedOrigin>*</AllowedOrigin><AllowedHeader>*</AllowedHeader></CORSRule></CORSConfiguration>
Step 7 – Verify CORS configuration
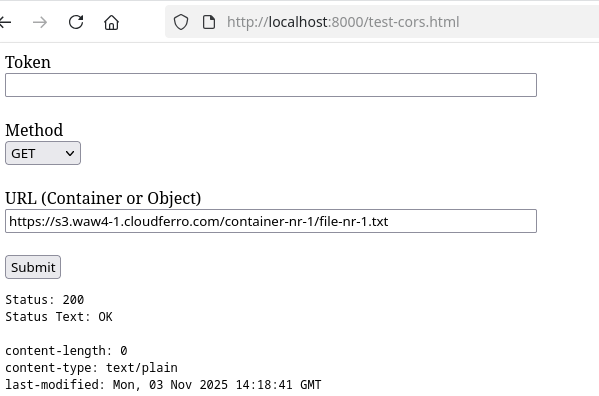
Reopen the test page and enter the S3-style URL:
https://s3.waw4-1.cloudferro.com/container-nr-1/file-nr-1.txt

Expected result:
HTTP status 200 OK or 304 Not Modified
No CORS error in the browser console
Response headers displayed in the upper section of the page
Results
After completing these steps, your S3 bucket is configured with a CORS policy that allows cross-origin browser access. You can now retrieve objects directly from web pages hosted on other domains, provided that the domain is permitted in <AllowedOrigin> of your configuration.
Troubleshooting
If s3cmd reports 403 AccessDenied, ensure that the EC2 credentials were generated in the same project as the container.
If CORS headers are configured but requests remain blocked, verify that the URL uses the S3 endpoint, not the Swift endpoint.
Ensure that the endpoint hostname in the configuration matches the region. For example, in the article we were using WAW4-1 so the corresponding endpoint in config file had to be s3.waw4-1.cloudferro.com.
To enable additional HTTP methods, add them under <AllowedMethod> in cors.xml.
If Status: 0 appears in the test page with an empty status text, ensure that the test page is served over HTTP (http://localhost:8000) and not opened from disk (file://).
Verify that you are testing against the S3-style URL (without /swift/v1/) since CORS headers are not returned by Swift endpoints.
What To Do Next
Other articles of interest: